Showing posts with label handmade. Show all posts

Friday, April 18, 2014

Storing Postcards: How to make a ring-bound booklet

 
I've been wondering for awhile now about what to do with all the Postcrossing postcards I've had stashed away in the cupboard.
 
I really didn't want to lose any, but I am beyond wanting a "postcard wall" or anything along those lines. What I wanted was a means by which I could store the cards without having to worry about them getting lost or damaged, ensuring their longevity, but still allowed them to be viewed.
 
Initially, I thought a solution may be to put them into a photo album or journal, but upon investigating this option, I realised that photo albums can be quite expensive, and I didn't want to spend a lot of money on this project, nor was I overly keen on the album designs. It soon dawned on me that if I were to use albums, the backside of the postcards, where the senders have written their messages, wouldn't be visible.
 
Then last weekend I was cleaning out some drawers when I came across an abundance of old curtain rings. These were left here by the previous owners (perhaps even the owners before them) for the large, heavy drapes they had at the windows. But since we have removed and replaced those with simple lace curtains, we've not had a need for the rings.
 
That is, until now!
 
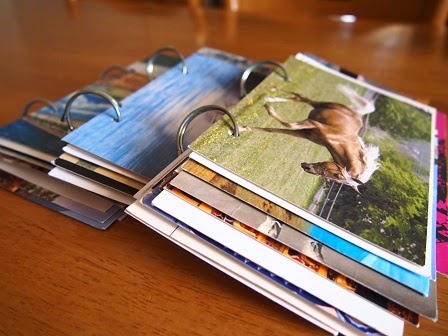
I realised pretty much immediately that I could put those rings to use and make booklets out of my Postcrossing postcards, binding them together in a way that will prevent any from getting lost, whilst still displaying both sides of the cards.
 
It's so quick, easy and inexpensive (even if I'd had to purchase the rings, it would still have been cheaper than photo albums) that I thought I'd share the process, in the event that anyone wants to do the same thing.


First, collate your cards and put them in order. I found that 30 cards per booklet was a good number, as it makes it comfortable to flip through the cards once they've been bound.
 
Then using a two-ring hole-punch, punch your cards. I like to stagger the positioning of the holes, so the cards are in a slightly different place within the booklet. This makes the booklet feel sturdy.


Once you've punched holes in all your cards, feed the rings through the holes, one card at a time (as pictured above), starting with the last/bottom card first and working your way to the first/top card (one placed on top of the other).


Once all cards are on the rings, you should have a neat little booklet that hasn't cost a fortune to make, and allows yourself (and others) to browse at leisure, without having to worry about losing or damaging the cards.


Sunday, March 30, 2014

Smash & Scrap

 
I've been rediscovering old hobbies like scrapbooking and smash books. I found some unfinished projects in the cupboard: A scrapbook album of our holiday to New Zealand in 2011, my first ever smash book, half-planned and barely started travel journals of our camping adventures on the Eyre Peninsula, and of my trip to Sydney in 2012.
 
I remember putting them away, thinking that I would return to them when I had more time, and then promptly forgot about them entirely. But it would be nice to finish them, and to start some new projects once they are done. I create a lot of scrap and smash book type things that always end up being sent to other people, but I've never actually finished a project for myself. How bizarre!
 
So, since I (in theory) have more time on my hands these days, I thought now would be the perfect opportunity to take the hobby back up, and as such, I've spent a fair portion of my weekend sorting through photos, keepsakes, card stock and embellishments, and searching ideas on Instagram, Pinterest and blogs.
 
Now I am just itching to get started!
 
Do you smash and/or scrap?


Sunday, September 22, 2013

365 Mail Art Project: Weeks 48, 49 & 50

Week 48:
 
 
Postcards made using upcycled pictures from an old tourist brochure went out to:
 
#169: Venus in Canada
#170: Liz in Canada
#171: Jessica in USA
#172: Blake in USA
 
 
Week 49:

 
Postcards made from scraps of card stock, paper, magazines and letters went out to:
 
#173: Martina in Germany
#174: Elaine in Canada
#175: Claire in UK


And postage collage cards went to:
 
#176: Jennifer in USA
#177: Laima in USA


Week 50:

 
My friend, Jen, is the Master in the art of marbled paper. She comes up with the best colour combinations that I absolutely love. So, of course I had to use some in my mail art project!
 
Decorated with washi and vintage typewriters, these pretty marbled envelopes are going out (with letters enclosed, of course!) to:
 
#178: Jennifer in Australia
#179: Nicola in Australia
#180: Hannah in UK
#181: Eleonora in Italy
#182: Raquel in Sweden
#183: Kelly in Malaysia
 
 
(POSTSCRIPT: Jen has an Etsy store and sells her marbled paper in sets, if you are interested in obtaining some for yourself)

Sunday, September 1, 2013

365 Mail Art Project: Weeks 46 & 47

 
I've been busy this past fortnight turning photographs into handmade postcards.
What a fantastic way to share favourite photos! I can't believe I didn't think of it sooner.
 
 
Weeks 46 & 47:

 
This selection of handmade postcards went out to:
#149: Mikaela in USA
# 150: Allison in USA
#151: Justina in Australia
#152: Rachel in USA
#153: Athanasia in Greece
#154:Barbara in USA
#155: Amber in USA
#156: Amy in Australia
#157: Denica in Australia
#158: Sarah in USA
#159: Meredith in USA
#160: Ingrid in USA
#161: Millie in USA
#162: Claudia in Germany
#163: Amanda in USA
#164: Beth in USA
#165: Tammie in USA
#166: Ksenia in Australia
#167: Lynn in USA


I also recently made an art journal letter booklet to send to a friend, but I didn't share it at the time as I wanted her to receive it before posting it on my blog, so I left it un-numbered, until now.

 
#168 of 365:
Masqued vampires (and 80 pages of creative missive awesome!) for Laura in the UK.


Sunday, July 7, 2013

365 Mail Art Project: Weeks 38 & 39

Quite a few mail art pieces to share this week. I must be feeling inspired (or something).
 
Week 38 I really wanted to do something with my watercolour paints, so I made some envelopes using art paper and painted on a simple dots-and-stripe pattern. I was quite surprised by how they turned out, although I ended up only making four as they were seriously time-consuming.
 
I'd like to try this style again in future.


#126 of 365:
Green for Kelly in the USA...


#127 of 365:
Purple for Felicia in Canada...


#128 of 365:
Pink for Tomoe in Japan...


#129 of 365:
And blue for Arjen in Belgium...
 
 
This week (week 39) I decided to use some of my own digital photography to make envelopes, then I prettied them up with either washi-tape and alphabet stickers, or just a splash of colour.
 
(FYI: The photos I printed using high quality 100gsm A4 paper, specifically designed for getting the best results from your pictures).


#130 of 365:
Graveyard cross for þorey in Iceland...


#131 of 365:
Patrick Daly's headstone for Sarah in the USA...


#132 of 365:
Giant redgums in black and white for Jennifer in Australia...


#133 of 365:
Giant redgums in colour for Sulea in Australia...


#134 of 365:
Arthur Hill Stace's headstone for Rachael in England...


#135 of 365:
Ruins in the Ranges for Amanda in the USA...


#136 of 365:
And weather worn trees for Lina in Lithuania.

Saturday, June 22, 2013

365 Mail Art Project: Weeks 35, 36 & 37

I don't mean for there to be three weeks between mail art posts, it just seems to happen that way of late. In the past three weeks I've been on holiday, been to Adelaide, and fallen sick with the winter sniffles twice. I must admit there hasn't been much time for mail art, but I am determined to finish this project and get as close to the 365 pieces in 365 days as I can!
 
I've so many paper scraps lying about in my craft drawer that were too good to throw out, so I decided to start putting them to good use.
 
First, I made envelopes out of 120gsm card/paper stock, then I painstakingly cut each strip of paper to approximately 1cm in width and added the ribbon finish. Each strip was then glued to the envelope in a random pattern.
 
 
#120 of 365:
For Laura in Australia...


#121 of 365:
For Dora in New Zealand...


#122 of 365:
For Turea in England...
 
 
Using the same technique, I then made flat cards. Being cards and not envelopes, the front is only part of the design. The flipside of the cards contains my message, and I'm contemplating sending them out in clear envelopes stitched at the edges.


#123 of 365:
For Amy in Australia...


#124 of 365:
For Alison in England...


#125 of 365:
For Robert in Slovakia.
 
 
Albiet a little time-consuming with all the cutting and pasting, this design is really easy to replicate, so if you've been contemplating having a crack at some mail art yourself but have been stuck for inspiration, something similar to this would be a good place to start.


Saturday, May 11, 2013

365 Mail Art Project: Weeks 29, 30 & 31

You'll have to forgive me.
For the past three weeks I've been completely oblivious to everything except Veronica Mars.
It's just one of those things that completely sucks me in and consumes all my time, each and every time I watch it.
If you've not seen it, you should.
 
But now, some mail art:
 
 
#108 of 365:
Queen Lizzie for Laura in Australia (soon to be England)...


#109 of 365:
A little teapot for Rusty in the USA...


#110 of 365:
Hey! Claire in Wales...


#111 of 365:
For Isabelle in Mexico...


#112 of 365:
And traversing the globe with Raquel in Sweden.