Showing posts with label crafts. Show all posts

Friday, April 18, 2014

Storing Postcards: How to make a ring-bound booklet

 
I've been wondering for awhile now about what to do with all the Postcrossing postcards I've had stashed away in the cupboard.
 
I really didn't want to lose any, but I am beyond wanting a "postcard wall" or anything along those lines. What I wanted was a means by which I could store the cards without having to worry about them getting lost or damaged, ensuring their longevity, but still allowed them to be viewed.
 
Initially, I thought a solution may be to put them into a photo album or journal, but upon investigating this option, I realised that photo albums can be quite expensive, and I didn't want to spend a lot of money on this project, nor was I overly keen on the album designs. It soon dawned on me that if I were to use albums, the backside of the postcards, where the senders have written their messages, wouldn't be visible.
 
Then last weekend I was cleaning out some drawers when I came across an abundance of old curtain rings. These were left here by the previous owners (perhaps even the owners before them) for the large, heavy drapes they had at the windows. But since we have removed and replaced those with simple lace curtains, we've not had a need for the rings.
 
That is, until now!
 
I realised pretty much immediately that I could put those rings to use and make booklets out of my Postcrossing postcards, binding them together in a way that will prevent any from getting lost, whilst still displaying both sides of the cards.
 
It's so quick, easy and inexpensive (even if I'd had to purchase the rings, it would still have been cheaper than photo albums) that I thought I'd share the process, in the event that anyone wants to do the same thing.


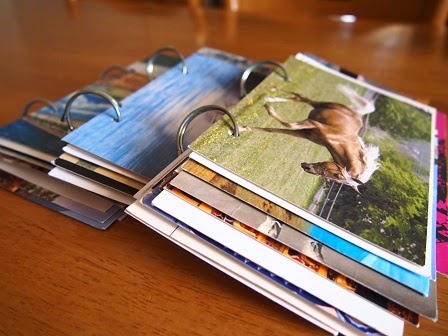
First, collate your cards and put them in order. I found that 30 cards per booklet was a good number, as it makes it comfortable to flip through the cards once they've been bound.
 
Then using a two-ring hole-punch, punch your cards. I like to stagger the positioning of the holes, so the cards are in a slightly different place within the booklet. This makes the booklet feel sturdy.


Once you've punched holes in all your cards, feed the rings through the holes, one card at a time (as pictured above), starting with the last/bottom card first and working your way to the first/top card (one placed on top of the other).


Once all cards are on the rings, you should have a neat little booklet that hasn't cost a fortune to make, and allows yourself (and others) to browse at leisure, without having to worry about losing or damaging the cards.


Sunday, March 30, 2014

Smash & Scrap

 
I've been rediscovering old hobbies like scrapbooking and smash books. I found some unfinished projects in the cupboard: A scrapbook album of our holiday to New Zealand in 2011, my first ever smash book, half-planned and barely started travel journals of our camping adventures on the Eyre Peninsula, and of my trip to Sydney in 2012.
 
I remember putting them away, thinking that I would return to them when I had more time, and then promptly forgot about them entirely. But it would be nice to finish them, and to start some new projects once they are done. I create a lot of scrap and smash book type things that always end up being sent to other people, but I've never actually finished a project for myself. How bizarre!
 
So, since I (in theory) have more time on my hands these days, I thought now would be the perfect opportunity to take the hobby back up, and as such, I've spent a fair portion of my weekend sorting through photos, keepsakes, card stock and embellishments, and searching ideas on Instagram, Pinterest and blogs.
 
Now I am just itching to get started!
 
Do you smash and/or scrap?


Saturday, October 5, 2013

365 Mail Art Project: Weeks 51 & 52

So, how did I spend the last two week of my 365 mail art project?


Week 51:
 
I spent a whole week writing and putting together a letter in a book of postcards...


#184:
Which is on its way to Laura in the UK.


Week 52:
 
Then I used copies of the old Certificate of Title for our property and made envelopes. This CT is a good example of how they used to look before they were/are converted (only people familiar with Torrens Title will know what I'm talking about here, so everyone else just go here) and sets out the historical ownership for the piece of land that we now call home.
 
These particular sheets set out the names and occupations of every owner, the dates of every transfer and discharge of mortgage from 1891 until 1982.
 
It's a neat piece of history, if you ask me.
 
And it seemed apt to send them both to the UK since the property first appeared on the Register in 1891, when Victoria was on the throne and we were still known as the Queen's Colony of South Australia...


#185: For Louise in the UK
#186: For Rachael in the UK


And with that, the 365 mail art project I started 12 months ago is now officially at a close.
 
Unfortunately, I was unable to make and send 365 pieces of mail art within the 365 days as I had planned. However, I did not have 365 days to dedicate to the making of mail art. In hindsight, I would be lucky to have had a third of that, so I am perfectly content to have made it to 186 pieces within that timeframe. It equates to 3.57 pieces of mail art a week, and I certainly can't be disappointed with that effort.
 
A 365 mail art project is certainly a project that can be quite time-consuming, and it has been a challenge to come up with new ideas each and every week over the past twelve months. However, I still heartily recommend it for anyone who wants to have a go, because even if you don't make the 365 pieces, it really is a fun and inspiring creative pursuit.


Sunday, September 22, 2013

365 Mail Art Project: Weeks 48, 49 & 50

Week 48:
 
 
Postcards made using upcycled pictures from an old tourist brochure went out to:
 
#169: Venus in Canada
#170: Liz in Canada
#171: Jessica in USA
#172: Blake in USA
 
 
Week 49:

 
Postcards made from scraps of card stock, paper, magazines and letters went out to:
 
#173: Martina in Germany
#174: Elaine in Canada
#175: Claire in UK


And postage collage cards went to:
 
#176: Jennifer in USA
#177: Laima in USA


Week 50:

 
My friend, Jen, is the Master in the art of marbled paper. She comes up with the best colour combinations that I absolutely love. So, of course I had to use some in my mail art project!
 
Decorated with washi and vintage typewriters, these pretty marbled envelopes are going out (with letters enclosed, of course!) to:
 
#178: Jennifer in Australia
#179: Nicola in Australia
#180: Hannah in UK
#181: Eleonora in Italy
#182: Raquel in Sweden
#183: Kelly in Malaysia
 
 
(POSTSCRIPT: Jen has an Etsy store and sells her marbled paper in sets, if you are interested in obtaining some for yourself)

Sunday, September 1, 2013

365 Mail Art Project: Weeks 46 & 47

 
I've been busy this past fortnight turning photographs into handmade postcards.
What a fantastic way to share favourite photos! I can't believe I didn't think of it sooner.
 
 
Weeks 46 & 47:

 
This selection of handmade postcards went out to:
#149: Mikaela in USA
# 150: Allison in USA
#151: Justina in Australia
#152: Rachel in USA
#153: Athanasia in Greece
#154:Barbara in USA
#155: Amber in USA
#156: Amy in Australia
#157: Denica in Australia
#158: Sarah in USA
#159: Meredith in USA
#160: Ingrid in USA
#161: Millie in USA
#162: Claudia in Germany
#163: Amanda in USA
#164: Beth in USA
#165: Tammie in USA
#166: Ksenia in Australia
#167: Lynn in USA


I also recently made an art journal letter booklet to send to a friend, but I didn't share it at the time as I wanted her to receive it before posting it on my blog, so I left it un-numbered, until now.

 
#168 of 365:
Masqued vampires (and 80 pages of creative missive awesome!) for Laura in the UK.


Sunday, August 18, 2013

365 Mail Art Project: Weeks 43, 44 & 45

Six weeks to go.
217 pieces of mail art yet to make and send out.
Can I do it?
 
One of the biggest challenges, aside from finding the time to make the mail art, has been finding people to send it to. I have just started a new batch of mail art to go out to the final few people who have emailed me requesting to be a part of the project.
 
I will happily accept more requests from people over the coming weeks, so if you think finding a piece of mail art in your letterbox might be kind of awesome, please do not hesitate to drop me an email! I'll be happy to oblige. At present, I'm about 50 recipients shy of 365.
 
I would especially love to send out some more pieces to fellow Australians, so if you're from Australia you should definitely email me. Like, NOW.


Weeks 43 & 44:
 
I was busy writing an 80-page letter to my BFF that I totally forgot to finish the mail art I started, so the pieces took two weekends to complete: Made the envelopes the first weekend, added the addresses the second. Why rush these things?
 
Using my own photos of the beach (I miss the ocean), I made the following envelopes:


#143 of 365:
Early morning, exposed reef for Astrid in Germany...


#144 of 365:
Stormy sunset for Dora in New Zealand...


#145 of 365:
Shoreline for Maaike in the Netherlands...


#146 of 365:
Dusk by the water for Rusty in the USA.


Week 45:
 
Two tiny teapot envelopes!

 
#147 of 365:
Pot of tea for Karlee in the USA...


#148 of 365:
And a pot of tea for Kirby in Australia.

Saturday, July 27, 2013

365 Mail Art Project: Weeks 40, 41 & 42

Week 40:
 
As I now only have the weekend in which to spend some time on creating new mail art pieces, I'm finding the project very slow moving at the minute, especially when I am trying something new.
 
Two envelopes went out in week 40 (dismal, really), each made from a print of some of my own digital photography. The letters were written on a large sheet of scrapbooking paper, which were divided into "sections" that served the purpose of numbered pages, making it easier to write on.
 
 
#137 of 365:
Spooky ruins for Kirby in Australia...


#138 of 365:
And a cemetery for Karlee in the USA.


Week 41:
 
In between traversing the countryside to try out my new camera, I managed to make this letter booklet using old postcards, bookmarks and tags. Paper was stuck to the back of the cards and folds out to reveal the letter. I then staggered the cards and bound them together using a ring binder, in the same way I would an art journal.


#139 of 365:
Postcard letter booklet for Janice Marie in Australia.


Week 42:
 
S T E A M P U N K !
I had fun this week making some steampunk themed envelopes to go out to friends.
 
Everyone likes steampunk, right?


#140 of 365:
Red & black steampunk lady for Ulrika in Sweden...


#141 of 365:
Trousered steampunk lady for Tarah in the Netherlands...


#142 of 365:
And gentlemanly steampunk for Riley in the USA.